

Authentic Indian Restaurant-Style Chicken Biryani
Chicken biryani is one of those dishes that has a reputation for being complicated that it has not entirely earned. Yes, it takes longer than a weeknight stir-fry. Yes, it has more steps than a one-pot soup. But the steps themselves are not complicated — they are just specific, and specific is different from difficult. The marinating, the rice parboiling, the layering, the dum cooking (the sealed steam finish that makes biryani biryani and not just spiced chicken and rice) — each step is straightforward once you understand what it is doing and why. Understanding what you are doing is the difference between following a recipe nervously and cooking confidently from one.
What comes out of the pot is the reason people have been making biryani for centuries: a deeply fragrant, layered rice dish where each grain of basmati is separate and long and perfumed with saffron and whole spices, the chicken underneath tender and deeply marinated, the fried onions scattered through everything adding sweetness and a slight caramel crunch, the fresh mint and cilantro providing the herbal freshness that makes the whole pot smell specifically of a good Indian restaurant at 7pm when the kitchen is at full capacity.
Make it on a Saturday when the afternoon is available. It rewards the time generously.
Understanding Biryani Before You Start
Biryani is a layered dish, not a mixed one. The rice and the marinated chicken are prepared separately, then layered in a pot, sealed, and cooked together in a steam environment called dum — the sealed cooking that allows the rice to absorb the fragrant steam from the chicken and spices below while the flavours meld without the components losing their individual identity. The rice is not cooked in the chicken marinade. The chicken is not cooked through before layering. Everything comes together in the dum stage, and the result is the interlocked, fragrant, specifically textured dish that distinguishes biryani from pilaf or from any other rice-and-chicken preparation.
The three non-negotiable components are: a properly marinated chicken with a yogurt-spice base, parboiled basmati rice (cooked to 70 percent done before layering, finishing in the dum), and properly crispy fried onions (called birista) that are made separately and scattered between the layers. Shortcut any of these three and the dish is still flavourful rice with chicken, but it is not biryani.
- Marinade Time: 2 hours minimum (overnight strongly preferred)
- Active Prep Time: 45 minutes
- Cook Time: 45 minutes
- Total Time: 3.5 to 4 hours (most of it hands-off)
- Yield: 6 generous servings
Market List
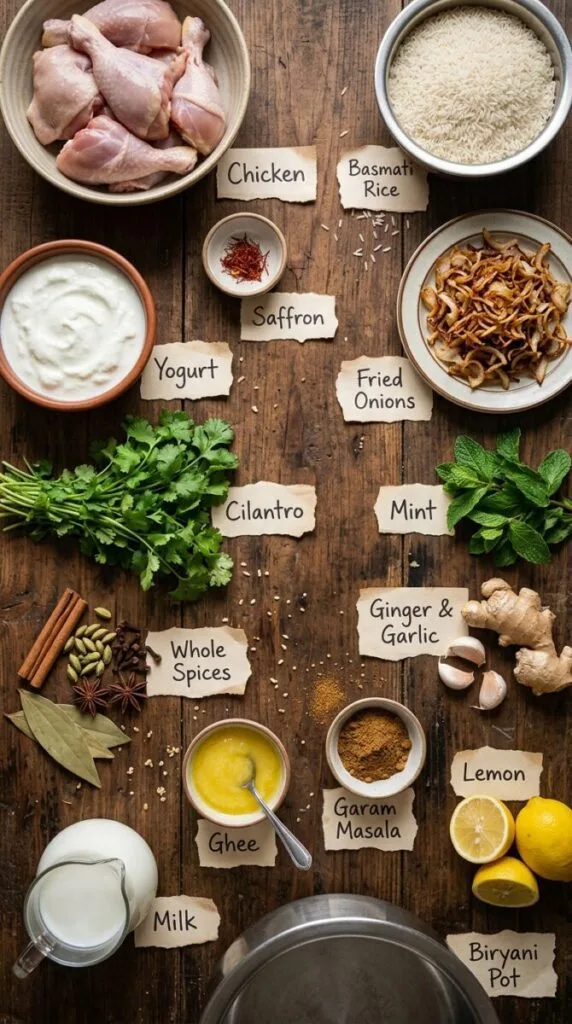
For the chicken marinade:
- Bone-in chicken pieces (thighs and drumsticks): 2.5 lbs (1.1kg) — bone-in pieces stay juicier through the dum cooking and provide flavour to the surrounding steam; cut deep slashes through the meat to the bone to allow the marinade to penetrate deeply
- Full-fat plain yogurt: 1 cup (225g)
- Fresh ginger-garlic paste: 2 tablespoons — equal parts fresh ginger and garlic blended with a little water to a smooth paste; this is the aromatic base of most Indian cooking and making it fresh produces significantly more flavour than using pre-made paste from a jar
- Red chilli powder (Kashmiri preferred): 1 1/2 teaspoons — Kashmiri chilli powder gives the characteristic deep red colour without excessive heat; regular chilli powder works but is hotter and less colourful
- Ground turmeric: 1/2 teaspoon
- Ground cumin: 1 teaspoon
- Ground coriander: 1 teaspoon
- Garam masala: 1 1/2 teaspoons
- Ground cardamom: 1/2 teaspoon
- Fresh lemon juice: 2 tablespoons
- Fine sea salt: 1 1/2 teaspoons
- Neutral oil: 2 tablespoons
For the fried onions (birista):
- Large yellow onions, thinly sliced: 3 — the thin, caramelised, slightly crispy fried onion that is biryani’s most important garnish and one of its most important flavour components; made separately, stored separately, and scattered in layers
- Neutral oil: for deep frying — enough to come 2 inches up a medium saucepan or skillet
For the rice:
- Aged basmati rice: 2 1/2 cups (500g) — aged basmati specifically; it has a lower moisture content and produces the distinctively long, separate grains that biryani requires; new crop basmati is stickier and more moisture-dense and produces a different result
- Water for parboiling: a large pot, well-salted — the rice will cook in salted water for 5 to 6 minutes to 70 percent doneness before being drained and layered
- Whole spices for the parboiling water: 1 bay leaf, 4 green cardamom pods (lightly crushed), 4 cloves, 1 small cinnamon stick, 1 star anise — these perfume the rice during parboiling
- Salt: enough to make the parboiling water taste like a well-seasoned soup — approximately 2 tablespoons per large pot; this is how the rice gets seasoned throughout rather than just on the surface
For the saffron milk:
- Saffron threads: a generous pinch (approximately 1/4 teaspoon) — steeped in 4 tablespoons of warm whole milk for 15 minutes; the saffron milk is drizzled over the final layer of rice before sealing and produces the characteristic golden streaks through the white rice
For the dum layer:
- Ghee or unsalted butter: 3 tablespoons — drizzled over the top rice layer before sealing
- Fresh mint leaves: a large handful — scattered between layers and over the top
- Fresh cilantro: a large handful — same
- Rose water (optional): 1 tablespoon — sprinkled over the final rice layer for the floral note that characterises Hyderabadi biryani specifically
- Fried onions (birista): half the batch goes between layers, half on top at serving
🍛 The Toolbox for Indian Restaurant-Style Chicken Biryani
Seven focused tools for par-boiled basmati, crisp birista, sealed dum steam, and gentle layering.

Cooks Standard Classic 6-Quart Stainless Steel Dutch Oven
A heavy-bottomed pot protects the bottom layer and a tight lid traps the steam that makes dum biryani work.

Reynolds Wrap Heavy-Duty Aluminum Foil
Foil under the lid creates a dramatic, effective steam seal for the final cooking stage.

Cuisinart Chef’s Classic 8-Quart Stockpot with Cover
A large stockpot gives basmati plenty of water to par-boil like pasta without crowding the grains.

OXO Good Grips Stainless Steel Colander
The fine perforations drain par-boiled rice quickly and rinse basmati thoroughly without losing grains.

Lodge Pre-Seasoned Cast Iron Skillet, 12-Inch
A wide skillet gives onions room to fry evenly into crisp, deeply browned birista.

Pyrex 3-Piece Glass Mixing Bowl Set
Separate bowls keep the chicken marinade and saffron milk organized before layering begins.

OXO Good Grips 12-Inch Tongs with Silicone Head
Long tongs lift chicken and birista into place without stirring the carefully built layers.
How to Make It
Day before or 2 hours before: Marinate the chicken:
- Cut deep slashes through each chicken piece to the bone — 2 to 3 slashes per piece. This allows the marinade to penetrate beyond the surface and produce chicken that is flavoured throughout rather than only at the surface.
- Combine all the marinade ingredients and mix well. Add the chicken pieces and coat thoroughly, working the marinade into the slashes. Cover and refrigerate for a minimum of 2 hours, overnight strongly preferred. The overnight marinade produces chicken where the yogurt has tenderised the muscle fibres and the spices have penetrated deeply — the 2-hour version is good; the overnight version is notably better.

Make the fried onions (birista):
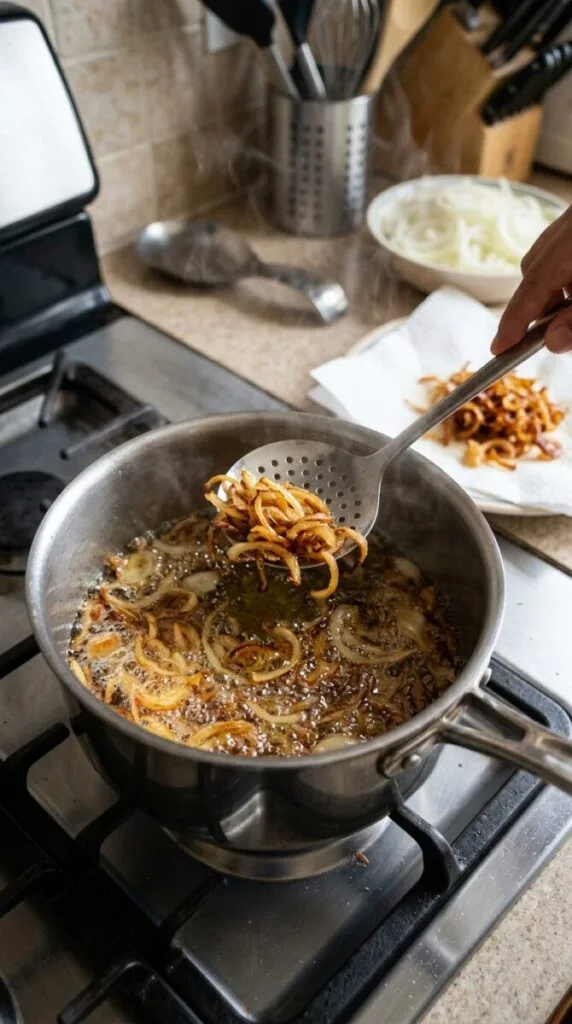
- Heat 2 inches of neutral oil in a medium heavy-bottomed saucepan to 325°F (165°C). Add the sliced onions in batches — do not crowd. Fry, stirring occasionally, for 12 to 15 minutes until the onions are deep golden brown and beginning to crisp. They will colour slowly for most of the cooking time and then quickly in the last 2 to 3 minutes — watch closely at the end and remove at deep amber, not black.
- Remove with a slotted spoon to paper towels. The onions will crisp further as they cool — they should look slightly underdone when removed from the oil. Spread in a single layer and allow to cool completely before storing in an airtight container.
Cook the chicken partially:
- Heat 2 tablespoons of oil in a large, wide pot (at least 5-quart capacity) over medium-high heat. Remove the chicken from the marinade, shaking off the excess marinade but leaving a thin coating. Brown the chicken pieces on all sides — 3 to 4 minutes per side — until the marinade coating is caramelised and fragrant. The chicken should be approximately 60 percent cooked through at this point.
- Pour any remaining marinade into the pot and cook for 2 minutes, stirring. Reduce the heat to low. The chicken and sauce form the bottom layer of the biryani.
Parboil the rice:
- Rinse the basmati rice under cold water until it runs clear. Soak in cold water for 30 minutes — soaking hydrates the grain and allows it to cook more evenly and achieve the specific long, separate grain that biryani requires. Drain.
- Bring a very large pot of water to a boil with the whole spices and the salt. The water should taste well-seasoned. Add the drained rice and cook for exactly 5 to 6 minutes — the rice should be 70 percent cooked: it should have a slight chalky line visible when a grain is broken in half, and the outer part should be cooked while the center remains firm. Drain immediately and spread on a large plate or baking sheet to stop the cooking.
Layer and dum cook:
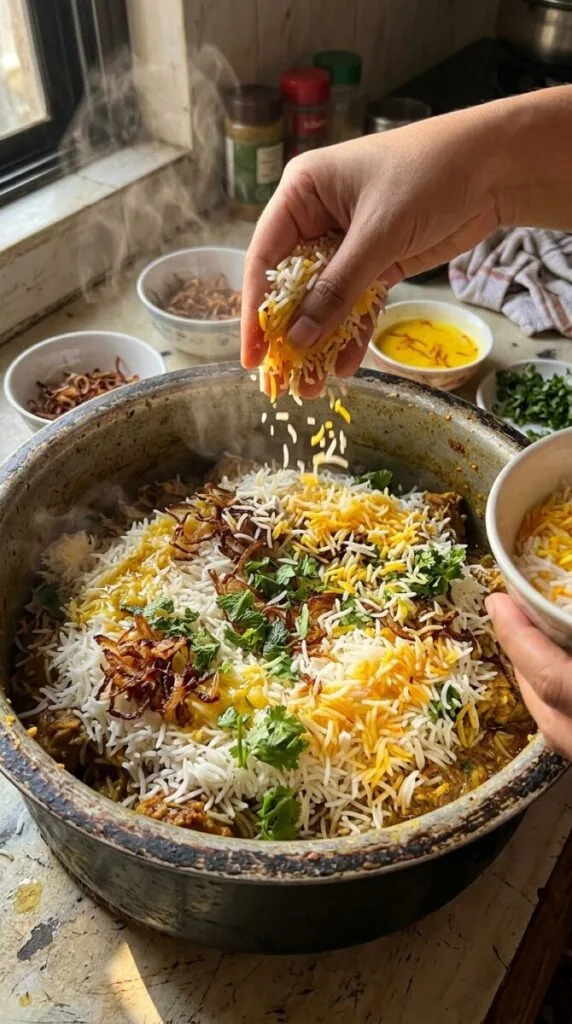
- The chicken with its sauce should be in the bottom of the large pot over low heat. Layer half the parboiled rice over the chicken. Scatter half the fried onions, half the fresh mint, and half the cilantro over the rice.
- Layer the remaining rice over the herb layer. Drizzle the saffron milk over the top rice layer — pour it in a circular pattern so the saffron distributes in streaks rather than concentrating in one spot. Drizzle the ghee or butter over the top. Scatter the remaining fried onions, mint, and cilantro over everything. Add the rose water if using.
- Seal the pot: cover tightly with a damp kitchen towel or foil, then place the lid firmly on top. The cloth or foil absorbs excess steam and prevents condensation from dripping back onto the rice, which would make it mushy. This seal is the dum.
- Cook on the lowest possible heat setting for 20 minutes. A heat diffuser under the pot is ideal if you have one. If the lowest burner setting feels high, place the pot in a preheated 325°F oven for 20 minutes instead — the oven provides more consistent, gentler heat.
- After 20 minutes, turn off the heat and rest without opening the lid for 10 minutes. The carryover steam completes the cooking of the remaining 30 percent of the rice and allows the layers to settle.
- Open the pot. The rice should be fully cooked, separate, and golden-streaked with saffron. Use a large spoon or spatula to serve by scooping through all layers — each portion should have rice from different levels and chicken from the bottom, showcasing all the layers. Do not mix the entire pot; serve by scooping down through the layers.

Chicken biryani with our Potato Spinach Curry (Aloo Palak) and a bowl of plain yogurt alongside is the Indian restaurant dinner at home that needs nothing else — the fragrant, layered biryani as the centrepiece, the creamy, spiced curry as the accompanying dish, and the cool yogurt as the palate-cooling constant that ties the table together. This is the dinner that earns its occasion. Make the curry while the biryani’s chicken marinates. By the time the dum finishes, both are ready simultaneously.
The Three Non-Negotiables: Marinade, Parboil, and Dum
The overnight marinade — specifically the yogurt component — is not primarily about flavour penetration, though it produces that too. Yogurt contains lactic acid, which breaks down the muscle proteins in chicken over time and produces a noticeably more tender, more yielding texture than chicken that has marinated for 2 hours at minimum. The difference between 2-hour marinated chicken and overnight marinated chicken in biryani is the difference between tender chicken and specifically meltingly tender chicken — the lactic acid tenderises the fibres without cooking them, producing the soft, flavour-saturated chicken that gives good biryani its character.
Parboiling the rice to exactly 70 percent done — and not further — is the most technically specific step in the recipe and the most important. Rice that goes into the dum at 70 percent done finishes perfectly in the 20-minute steam environment, with the remaining 30 percent of the starch absorbing the fragrant steam from the chicken and spices below. Rice that goes in at 80 or 90 percent done overcooks in the dum and becomes soft and slightly sticky — losing the separate, long-grain quality that makes biryani rice specifically beautiful. The visual test — a slight chalky line in the center of a broken grain — is reliable and learnable. Set a timer for 5 minutes on the first attempt and taste from there.
The dum — the sealed, low-heat steam finish — is the step that makes biryani biryani. The seal traps the fragrant steam from the chicken, spices, and ghee in the pot with the rice, and the rice absorbs that steam as it finishes cooking. This is not the same process as simply covering a pot and simmering — the steam environment in a sealed dum pot is concentrated and fragrant in a way that open-pot cooking cannot replicate. The cloth-or-foil seal prevents the condensation that would otherwise drip back and wet the rice; the low heat prevents the bottom from burning before the steam has done its work. Do not rush the dum. Do not open the lid during the dum. The 20 minutes plus 10-minute rest is the full process.
The Birista: Why Fried Onions Cannot Be Skipped
The fried onions — birista — are the component most often skipped in home biryani recipes with the substitution of caramelised onions or raw onions, and the substitution produces a noticeably different result. Properly deep-fried onions are crispy, sweet, deeply caramelised, and slightly bitter at the edges in a way that provides textural contrast and flavour complexity that neither raw nor pan-caramelised onions can replicate. In the dum, the crispy onions absorb steam and soften slightly while maintaining a chewiness and sweetness that disperses through every layer. The onions scattered on top at serving remain crispy and provide the textural contrast that makes the finished biryani feel specifically complete.
They can be made 2 to 3 days ahead and stored in an airtight container at room temperature — they actually become slightly better stored for a day as they dry further. Making them ahead is the preparation that most reduces the day-of work.
What to Serve Alongside
Biryani is served with raita — a cool yogurt condiment — as the primary accompaniment in virtually every Indian tradition. The simplest version: plain full-fat yogurt whisked smooth with a pinch of cumin, salt, and either grated cucumber or diced tomato. The cool, dairy richness of the raita against the hot, spiced biryani is the pairing that makes the biryani eating experience complete rather than just intense.
A simple kachumber salad — diced cucumber, tomato, red onion, fresh cilantro, and lemon juice — alongside provides the fresh, crunchy element that the rich biryani benefits from as a contrast.
Our Black Bean and Lentil Soup, while not traditionally Indian, follows a broadly similar spice profile (cumin, coriander, warm spices) and serves as the most warming possible accompaniment on a cold night when the biryani alone is not quite enough for the table.
Variations and Regional Notes
Hyderabadi Biryani (Kacchi Style): The kacchi method uses raw marinated chicken (not partially cooked) layered with parboiled rice and cooked entirely in the dum. The chicken cooks completely in the steam and the rice absorbs the raw chicken’s juices and fat as the chicken cooks — producing a more deeply flavoured, more juicy chicken and a more intensely chicken-flavoured rice. The kacchi method requires a slightly longer dum (30 to 35 minutes) and more confident heat management to ensure the raw chicken cooks through in the sealed pot. This is the more traditional method and, for many biryani devotees, the definitive version.
Vegetable Biryani: Replace the chicken with 3 cups of mixed vegetables — potatoes, carrots, peas, cauliflower, and green beans — marinated in the same yogurt and spice base. Partially cook the vegetables before layering exactly as the chicken would be partially cooked. The vegetable biryani is lighter and faster than the chicken version (the vegetables partially cook in 8 to 10 minutes rather than the 15 to 20 the chicken requires) and is the version to serve at a table that includes vegetarians alongside meat-eaters without making either feel compromised.
Lamb Biryani: Replace the chicken with 2 lbs of bone-in lamb pieces (shoulder or leg). Lamb requires a longer marinade (4 to 6 hours minimum, overnight ideal) and a longer partial cook before layering (25 to 30 minutes rather than 15 to 20). The dum time increases to 30 minutes for lamb. The result is the most richly flavoured biryani direction — lamb’s fat and collagen produce a deeply savoury, particularly fragrant dum steam that the chicken version cannot quite match.
Nutritional Information
| Nutrient | Amount Per Serving (based on 6 servings) |
|---|---|
| Calories | 595 kcal |
| Protein | 38 g |
| Carbohydrates | 68 g |
| Fats | 18 g |
595 calories per serving reflects the bone-in chicken, the basmati rice, the ghee, the fried onions, and the yogurt marinade together — a generous, complete, satisfying dinner portion. The 38 grams of protein from the chicken is one of the highest per-serving protein counts in the collection. The 68 grams of carbohydrate comes almost entirely from the rice. The 18 grams of fat come from the ghee, the frying oil absorbed by the onions, and the chicken. Without the fried onions (a significant reduction in oil), the fat count drops to approximately 12 grams per serving.
Make-Ahead and Leftovers
The marinade is always best done the night before — overnight marination is the genuine preference, not just a suggestion. The birista can be made 2 to 3 days ahead. The parboiling can be done 1 to 2 hours before layering, with the rice spread on a tray to dry slightly before the dum.
Leftover biryani — reheated the next day — is one of the great food experiences available to anyone who has made it. The flavours continue to develop overnight as the rice absorbs the spice and chicken flavours further, the saffron distributes more completely through the rice, and the biryani arrives at a more integrated, more cohesive version of itself. Reheat by sprinkling 2 tablespoons of water over the biryani in a covered pot over the lowest heat setting for 10 to 12 minutes — the water generates gentle steam that reheats the rice without drying it. The microwave at 70 percent power in 90-second intervals, with a damp paper towel draped over the top, also works and is faster.
The Mistakes Worth Knowing
Overcooking the rice during parboiling — past the 70 percent stage — is the most common error and the one that most affects the finished texture. Overcooked parboiled rice absorbs too much steam during the dum and becomes soft and clumping rather than separate and long-grained. Set a timer for 5 minutes on first attempt, taste the rice, and look for the chalky center. Pull the rice the moment the chalky line is just barely present. It will finish in the dum.
Not sealing the dum properly — using a lid that does not fit tightly, or without the cloth layer underneath — allows the steam to escape rather than circulating within the pot. The result is rice that cooks unevenly, with the top layer drying and the bottom layer over-steaming. The damp kitchen towel under the lid is the technique that traps the steam correctly. If the lid is loose-fitting, seal the edge with a ring of dough (a atta dough seal is the traditional method) or use heavy-duty foil pressed tightly against the pot before placing the lid.
Rushing the marination produces chicken that is seasoned at the surface but bland and under-tenderised in the center — the yogurt’s lactic acid needs time to penetrate the muscle fibre and break it down. Two hours produces acceptable chicken; overnight produces specifically excellent chicken. If the overnight rest is genuinely not possible, the minimum 2 hours is worthwhile. But if there is any way to plan ahead, the overnight marinade is the single most impactful advance preparation in the recipe.
Marinated Chicken · Aged Basmati · Saffron · Fried Onions
Indian Restaurant-Style Chicken Biryani
Yogurt-marinated chicken layered with fragrant basmati rice, golden fried onions, saffron milk and fresh herbs. A sealed dum finish brings the layers together while keeping the rice fluffy and the chicken tender.
Ingredients
As an Amazon Associate, we earn from qualifying purchases. Ingredient links below are affiliate links.
For the Chicken Marinade
- Bone-in chicken thighs and drumsticks 2½ lb / 1.1 kg
- Full-fat plain yogurt 1 cup / 225 g
- Ginger-garlic paste, preferably freshly made 2 tbsp
- Kashmiri red chilli powder 1½ tsp
- Ground turmeric ½ tsp
- Ground cumin 1 tsp
- Ground coriander 1 tsp
- Garam masala 1½ tsp
- Ground cardamom ½ tsp
- Fresh lemon juice 2 tbsp
- Fine sea salt 1½ tsp
- Neutral oil, for the marinade 2 tbsp
For the Fried Onions & Chicken Browning
- Yellow onions, thinly sliced 3 large
- Neutral oil, for frying onions about 2 inches deep in a suitable pot
- Neutral oil, for browning chicken 2 tbsp
For the Rice
- Aged basmati rice, dry 2½ cups / 500 g
- Water, for soaking and parboiling; tap water is fine a large pot for boiling
- Bay leaf 1
- Green cardamom pods, lightly crushed 4
- Whole cloves 4
- Cinnamon stick 1 small
- Star anise 1
- Salt, for parboiling water about 2 tbsp; adjust to water volume
For the Saffron Milk & Layers
- Saffron threads a generous pinch / about ¼ tsp
- Whole milk, warm 4 tbsp
- Ghee or unsalted butter, melted 3 tbsp
- Fresh mint leaves a large handful
- Fresh cilantro, roughly chopped a large handful
- Food-grade rose water, optional 1 tbsp
How to Make It
- Marinate the chicken Make 2–3 deep slashes in each chicken piece. Mix the yogurt, ginger-garlic paste, ground spices, lemon juice, 1½ teaspoons salt and 2 tablespoons marinade oil. Coat the chicken thoroughly, working the marinade into the slashes. Cover and refrigerate for at least 2 hours, preferably overnight.
- Fry the onions Heat about 2 inches of neutral oil in a deep, heavy-bottomed saucepan to 325°F (165°C), keeping the pot no more than half full of oil. Fry the onions in small batches for approximately 12–15 minutes, stirring and watching closely as they turn golden. Remove before they become dark brown; they continue coloring after removal. Drain in a single layer on paper towels. Reserve half for the layers and half for serving.
- Soak the rice and steep the saffron Rinse the rice until the water runs clear. Soak in cold water for 30 minutes, then drain. Meanwhile, steep the saffron in the warm milk for at least 15 minutes. Have the rice water heating before starting the chicken so the cooking stages follow each other without a long pause.
- Brown the chicken Heat 2 tablespoons oil in a wide, heavy-bottomed pot of at least 5-quart capacity over medium-high heat. Lift the chicken from the marinade, reserving the marinade. Brown the pieces for about 3–4 minutes per side, adjusting the heat to prevent scorching. They will finish cooking during the dum stage.
- Simmer the chicken and marinade Add the reserved marinade to the chicken and bring it to a bubbling simmer, stirring carefully. Cook for at least 2 minutes, then reduce the heat to low. Keep the chicken and sauce hot while finishing the rice. Continue directly to layering and dum cooking; do not refrigerate partially cooked chicken to finish later.
- Parboil the basmati Bring a large pot of water to a boil with the bay leaf, cardamom pods, cloves, cinnamon and star anise. Salt the water to taste, adjusting the listed amount to the water volume. Add the soaked, drained rice. Begin checking at 5 minutes; it should be tender outside but distinctly firm with a chalky center. Drain immediately, usually after 5–6 minutes. Remove the large whole spices if desired.
- Build the layers Spread half the parboiled rice over the hot chicken and sauce. Scatter over the half-batch of fried onions reserved for layering, plus half the mint and cilantro. Cover with the remaining rice.
- Add saffron milk and ghee Drizzle the saffron milk over the top in streaks. Add the melted ghee or butter, the remaining mint and cilantro, and the rose water if using. Keep the remaining fried onions aside for serving.
- Seal and dum cook Cover the pot opening tightly with heavy-duty foil, keeping it clear of the burner, then fit the lid. Cook over very low heat for about 20 minutes. A suitable heat diffuser can help prevent scorching. Alternatively, use an oven-safe pot and lid in a preheated 325°F (165°C) oven, beginning to check after 20 minutes. Do not use a hanging kitchen towel near a flame or heating element.
- Check doneness and rest Carefully open the seal away from your face. Check that the rice is tender and the thickest part of the chicken reaches at least 165°F (74°C), measuring without touching bone. If needed, reseal and continue cooking, checking again until done. Once cooked, turn off the heat and rest covered for 10 minutes.
- Serve through the layers Scatter the reserved fried onions over the top. Scoop down through the layers so each serving includes chicken and rice from different levels. Avoid stirring the whole pot. Remove any remaining large whole spices as you serve.
*The 3½–4-hour estimate includes the minimum marinade. Overnight marination adds time. Onion batches, chicken size, pot and heat source affect cooking time; use temperature rather than timing alone to confirm the chicken is cooked.
Nutrition
| Nutrient | Per serving (⅙ of the recipe) |
|---|---|
| Calories | 595 kcal |
| Protein | 38 g |
| Carbohydrates | 68 g |
| Fat | 18 g |
Estimates supplied with the original recipe, not independently calculated. Actual values vary with chicken portions, frying-oil absorption and serving size.