


Cheesy Thumbprint Appetizers — Easy 3-Ingredient Party Bites
Oh, hello there, fellow food adventurer! Are you ready to dive headfirst into a world where buttery, savory, melt-in-your-mouth goodness reigns supreme? A world where tiny, adorable bites pack a massive flavor punch? If you’ve ever found yourself staring into the abyss of an empty appetizer platter, wondering how to magically refill it with something truly spectacular (and shockingly easy!), then you, my friend, are in the right place. Today, we’re unlocking the secrets to the most delightful, crowd-pleasing, and utterly addictive morsels you’ll ever bake: cheesy thumbprint appetizers!
Forget those sad, store-bought, mystery-meat puffs. We’re talking about elegant, homemade appetizers that look fancy but are secretly a breeze to make. These aren’t just snacks; they’re tiny canvases of culinary joy, each one a testament to the glorious combination of flaky dough and rich, savory cheese. Perfect for holiday gatherings, game nights, or just because it’s Tuesday and you deserve something delicious. Prepare for compliments, recipe requests, and the distinct possibility of having to make a second batch because the first one vanished faster than a magician’s rabbit!

🎉 Why You’ll Obsess Over This Recipe
Let’s be real, who doesn’t love an appetizer that practically disappears the moment it hits the table? These cheesy thumbprint appetizers are more than just a dish; they’re an experience. Here’s why you’ll be making them on repeat:
- Effortlessly Elegant: They look like you spent hours slaving away, but the truth is, they’re surprisingly simple to assemble. Your secret is safe with us!
- The Ultimate Crowd-Pleaser: Cheese + flaky pastry = universal love. Seriously, try to find someone who doesn’t adore these. It’s a challenge we bet you’ll lose.
- Incredibly Versatile: While we’re focusing on cheesy goodness today, the “thumbprint” concept opens up a world of possibilities for fillings. But first, cheese!
- Make-Ahead Magic: You can prepare these little beauties in advance, making party prep a whole lot less stressful. Because who needs last-minute panic when you can have perfectly baked treats?
- Portable Perfection: They’re perfectly sized as savory finger foods, meaning no forks or fuss required. Just grab and go (or grab and stay, we don’t judge).
In short, these are the appetizers that will have your guests asking, “Can I get this recipe?” before they even finish their first bite. And that, my friends, is the mark of a truly successful dish.
🧀 Ingredients You’ll Need
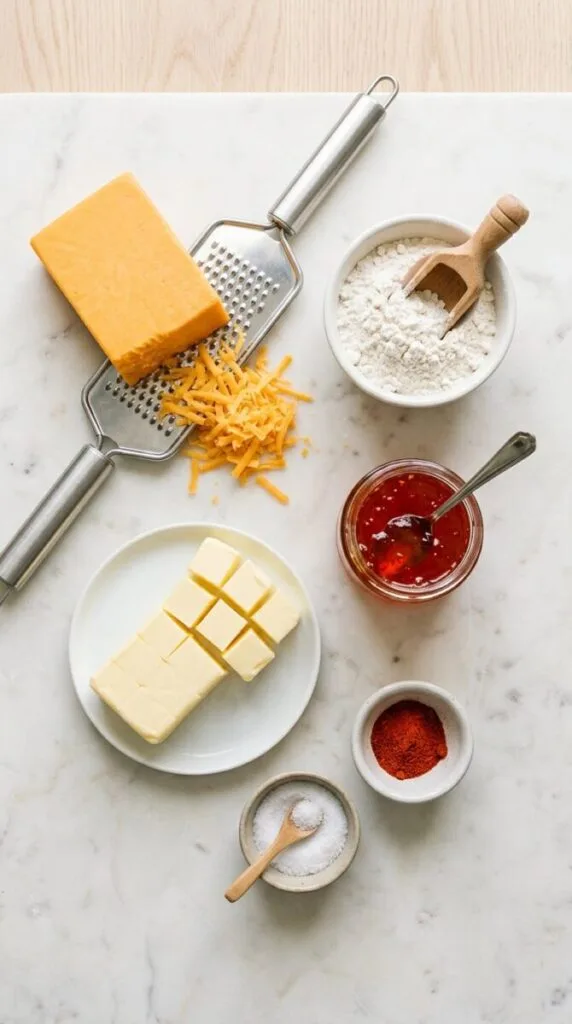
Core Ingredients (Just 3)
- 2 cups (8 oz / 225 g) sharp cheddar cheese, finely shredded: The backbone of the flavor. Sharp cheddar gives the boldest taste; a mix of cheddar and Parmesan is even punchier. Shred it yourself — bagged cheese won’t bind the dough.
- 1 cup (125 g) all-purpose flour: Spooned and leveled. The flour provides just enough structure to hold the cheese together without making the bites bready.
- ½ cup (1 stick / 113 g) cold unsalted butter, cut into small cubes: Cold butter creates the crisp, shortbread-like texture. Salted butter works, but you’ll want to skip any added salt.
The Thumbprint Filling
- ¼ to ½ cup pepper jelly (or apricot, fig, or raspberry jam): The sweet contrast to the salty cheese. Pepper jelly gives that classic sweet-heat; any thick jam or jelly works. Avoid thin, runny preserves, which bubble out during baking.
Optional Flavor Boosters (Highly Recommended!)
- ¼ tsp cayenne pepper or smoked paprika: Adds a subtle warmth that deepens the cheese flavor without heat.
- ½ tsp fine sea salt: Lifts the cheese (skip if using salted butter or salty cheese like Parmesan).
- ¼ tsp garlic powder: A savory undertone that rounds out the cheddar.
👩🍳 Step-by-Step Instructions
Step 1: Preheat and Prep
Preheat the oven to 400°F (200°C) and line a baking sheet with parchment paper. The high heat is what crisps the outside while the center stays cheesy and soft.
Step 2: Make the Dough
Add the shredded cheese, flour, cold butter cubes, and any boosters (cayenne, salt, garlic powder) to a food processor. Pulse in short bursts until the mixture forms a coarse, crumbly dough that clumps together when pressed between your fingers — about 15 to 20 pulses. No food processor? Cut the butter into the flour and cheese with a pastry cutter or your fingertips, then knead briefly until it comes together.

Step 3: Roll and Press
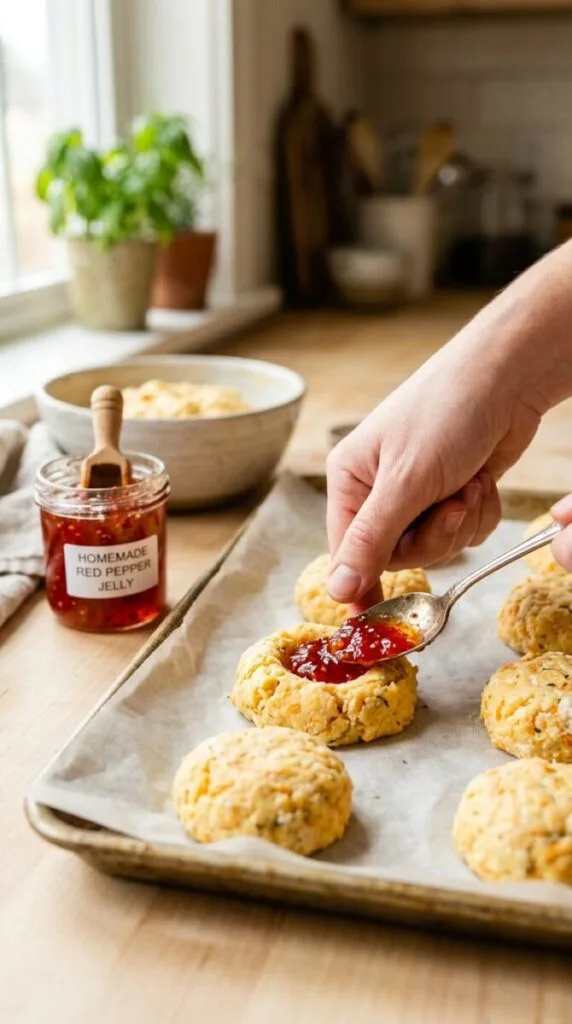
Roll the dough into 1-inch balls and place them about 1½ inches apart on the prepared sheet. Use your thumb (or the back of a small measuring spoon) to press a deep indentation into the center of each ball, leaving a well for the filling. The dough will be slightly crumbly at the edges — gently pinch any cracks closed.
Step 4: Fill the Thumbprints
Spoon a scant ½ teaspoon of pepper jelly into each indentation. Do not overfill — a little less jelly than looks right is correct, because the jelly liquefies and spreads as it heats, and overfilled bites bubble over into a sticky mess.
Step 5: Bake
Bake for 12 to 15 minutes, until the edges are deeply golden and the cheese is crisp. The jelly will look molten and glossy. If the dough balls are chilled, add 1 to 2 minutes.
Step 6: Cool and Serve
Let the bites cool on the sheet for 5 minutes — the jelly is molten-hot straight from the oven — then transfer to a serving platter. Serve warm for the meltiest center, or at room temperature for a crisp, cracker-like bite.
♻️ Substitution Suggestions
Life happens, and sometimes you don’t have exactly what the recipe calls for. No worries! These easy party snacks are forgiving. Here are some smart substitutions:
- Life happens, and sometimes you don’t have exactly what a recipe calls for. No worries! These easy party snacks are forgiving. Here are some smart substitutions:
- Butter: While butter gives the best flavor and texture, you can use a plant-based butter alternative for a dairy-free option. Choose one that is firm enough for baking.
- Flour: For a gluten-free version, use a 1:1 gluten-free baking flour blend that contains xanthan gum.
- Shredded Cheese: Get creative with the cheese! Swiss, Gruyère, Monterey Jack, Colby, mozzarella, or pepper jack can all work well. You can also combine different cheeses for extra flavor.
- Seasonings: Don’t have garlic or onion powder? A small pinch of finely minced fresh garlic or chopped chives can add a fresh kick. Dried herbs such as oregano or thyme, or a touch of smoked paprika, can also change up the flavor.
Remember, baking is an art, but it’s also about having fun and making it work with what you’ve got!
🥂 What to Pair
These cheesy thumbprint appetizers are so good, they almost don’t need a sidekick. Almost. But for the full experience, here are some perfect pairings:
- Wine: A crisp Sauvignon Blanc, a light-bodied Pinot Noir, or a dry Rosé would complement the richness of the cheese beautifully. For something sparkling, a Cava or Prosecco is always a festive choice.
- Beer: A light lager, a crisp pilsner, or even a session IPA would be refreshing against the savory bites.
- Non-Alcoholic: Sparkling cider, a zesty lemonade, or a sophisticated mocktail with fresh herbs and citrus.
- Other Appetizers: Balance the cheesy richness with something fresh! A vibrant crudité platter with a light dip, fresh fruit skewers, or even mini caprese bites would be perfect.
- Dips: While they are delicious on their own, a side of marinara sauce, a spicy jalapeño jelly (oh, yes!), or even a simple balsamic glaze could offer an extra layer of flavor.
Just imagine: you, a glass of something delightful, and a plate full of these glorious little bites. Pure bliss!
🔗 Similar recipes here: The BEST Cowboy Caviar Ever | Easy 5-Minute Recipe
📊 Nutritional Information (Estimated)
Let’s be honest, when something tastes this good, counting calories usually takes a backseat. But for those who are curious or need to track, here’s a rough estimate per appetizer. Please remember, these values are highly approximate and can vary based on specific ingredients, portion sizes, and exact preparation methods.
- Calories: Approximately 80-100 kcal
- Total Fat: Approximately 6-8g
- Saturated Fat: Approximately 4-5g
- Carbohydrates: Approximately 4-6g
- Protein: Approximately 2-3g
- Sodium: Approximately 70-90mg
Consider this a friendly guide, not a definitive nutritional label. The most important nutritional information? They are 100% delicious and 200% worth every bite!
💡 Pro Tips for the Perfect Batch
You’re well on your way to thumbprint appetizer glory! But even good things can be made even better with a few insider tricks. Consider these your secret weapons for achieving appetizer perfection:
- Don’t Skip the Chill: Chilling the dough is crucial! It makes the dough much easier to handle, prevents it from spreading too much in the oven, and contributes to a flakier texture. If your kitchen is warm, you might need to chill it a bit longer.
- Measure Flour Correctly: For baking, accuracy matters. Spoon your flour into the measuring cup and then level it off with a straight edge. Scooping directly from the bag can compact the flour, leading to a denser, tougher dough.
- Softened, Not Melted: Both butter and cream cheese for the dough need to be softened (room temperature) but not melted. This allows them to cream together properly, incorporating air and creating a tender dough.
- Gentle Touch with the Dough: Avoid overmixing the dough once the flour is added. Mix just until combined. Overworking the dough develops gluten too much, resulting in a tough, chewy texture instead of a delicate, flaky one.
- The Perfect Indent: Use your thumb, but don’t be afraid to use the back of a small measuring spoon (like a 1/2 teaspoon) for a more uniform and deeper indent. This ensures plenty of room for that glorious cheesy filling!
- Don’t Overfill: While tempting to pack in as much cheese as possible, overfilling can cause the cheese to bubble over and spread, making a mess and potentially sticking to your parchment paper. A heaping 1/2 teaspoon is usually perfect.
- Even Baking: If your oven has hot spots, rotate your baking sheets halfway through the baking time for uniformly golden appetizers.
- Cool Before Moving: Let the baked appetizers cool on the baking sheet for a few minutes before transferring them to a wire rack. They’ll be delicate when hot and firm up as they cool.
Armed with these tips, your cheesy thumbprint appetizers will be the talk of the town!
🎨 Easy Variations to Try
Once you’ve mastered the classic cheesy version, the world of thumbprint appetizers is your oyster! Here are some fun and delicious twists to keep things exciting:
- Spicy Jalapeño Cheddar: Add finely minced fresh jalapeño (remove seeds for less heat) to the cheddar filling. A tiny splash of hot sauce wouldn’t hurt either!
- Bacon & Chive: Mix cooked, crumbled bacon bits and fresh chopped chives into your cheesy filling. Everything’s better with bacon, right?
- Pesto & Mozzarella: Ditch the cheddar and fill your thumbprints with a dollop of store-bought or homemade pesto, topped with a sprinkle of shredded mozzarella cheese. A little sun-dried tomato could be a brilliant addition here too.
- Caramelized Onion & Gruyere: Sauté onions slowly until deeply caramelized, then mix with shredded Gruyere cheese for a sophisticated, savory bite.
- Spinach Artichoke: Chop up some defrosted, squeezed dry frozen spinach and finely chopped canned artichoke hearts. Mix with cream cheese, Parmesan, and a touch of garlic powder for a miniature version of the beloved dip.
- Sweet Potato & Feta: A bit unconventional but surprisingly delicious! Mash some roasted sweet potato with crumbled feta cheese and a hint of rosemary.
These variations are fantastic ways to keep your guests guessing and your taste buds tingling. Don’t be afraid to experiment with your favorite flavor combinations!
❄️ How to Store & Reheat
Making a big batch of these homemade appetizers is smart! Here’s how to keep them fresh and ready for action:
- Storing Baked Appetizers: Once completely cooled, store the baked cheesy thumbprint appetizers in an airtight container at room temperature for up to 2-3 days, or in the refrigerator for up to 5 days. Layer them with parchment paper to prevent sticking.
- Reheating Baked Appetizers: For best results, reheat them in a preheated oven at 300°F (150°C) for about 5-10 minutes, or until warmed through and the cheese is slightly bubbly again. A toaster oven works great too! Avoid the microwave if you want to maintain the crispy, flaky texture.
- Freezing Unbaked Dough Balls: You can prepare the dough balls and press the indents, then arrange them on a baking sheet and freeze until solid. Once frozen, transfer them to a freezer-safe bag or container for up to 1 month. When ready to bake, place them on a parchment-lined baking sheet, fill with cheese, and bake from frozen, adding a few extra minutes to the baking time.
- Freezing Assembled (Unbaked) Appetizers: You can also fully assemble them (dough balls with filling) and freeze them on a baking sheet until solid, then transfer to a freezer bag. Bake from frozen as above, adding extra time.
- Freezing Baked Appetizers: Fully baked and cooled appetizers can also be frozen for up to 1 month. Thaw in the refrigerator overnight and then reheat as directed above.
Having a stash of these ready to go is like having a superpower for impromptu gatherings or sudden snack cravings!
❌ Common Mistakes to Avoid
Even the best recipes can go awry if you’re not careful. Here are a few pitfalls to sidestep for guaranteed success with your cheesy thumbprint appetizers:
- Overworking the Dough: This is a big one! Mixing the dough too much after adding the flour develops the gluten, making your pastry tough and chewy instead of tender and flaky. Mix until just combined.
- Not Chilling the Dough: Skipping the refrigeration step means a sticky, difficult-to-handle dough that will spread too much in the oven, resulting in flat, misshapen appetizers. Patience is a virtue here!
- Using Cold Butter/Cream Cheese for Creaming: If your butter and cream cheese aren’t properly softened, they won’t cream together smoothly, leading to a lumpy dough and an uneven texture.
- Overfilling the Indents: While generosity is usually appreciated, too much filling will cause the cheese to overflow during baking, making a mess and potentially burning. A small, neat spoonful is best.
- Underbaking: If the edges aren’t golden and the cheese isn’t bubbly, they’re not done! Underbaked dough can be pasty and flavorless.
- Forgetting the Salt: A little salt in the dough is essential for balancing the richness of the butter and cheese, and enhancing all the other flavors. Don’t skip it!
- Not Lining Baking Sheets: Parchment paper is your best friend here. It prevents sticking and makes cleanup a breeze. Nobody wants to scrape off burnt cheese!
Keep these in mind, and you’ll be baking like a pro in no time!
❓ FAQ
Q: Can I make the dough ahead of time?
A: Absolutely! You can make the dough up to 2-3 days in advance and store it tightly wrapped in plastic in the refrigerator. Just let it soften slightly at room temperature for about 15-20 minutes before rolling and shaping.
Q: What’s the best cheese for the filling?
A: Sharp cheddar is fantastic for its robust flavor, but a blend of cheddar and mozzarella, or even Gruyere, Swiss, or Monterey Jack, would also be delicious. Choose a cheese you love to eat on its own!
Q: My dough is too sticky. What should I do?
A: This usually means it hasn’t been chilled enough. Pop it back in the fridge for another 30 minutes to an hour. If it’s still too sticky, you can add a tiny bit more flour (1 tablespoon at a time) and gently knead it in until it’s workable, but be careful not to add too much.
Q: Can I use different types of flour?
A: All-purpose flour is recommended for this recipe. While you can experiment with 1:1 gluten-free blends, using other flours like whole wheat will significantly change the texture and might require recipe adjustments.
Q: How do I get uniform sizes?
A: A small cookie scoop (about 1 tablespoon size) is perfect for portioning out the dough. This will help ensure all your appetizers bake evenly and look consistent.
✅ Explore more meals: Family favorite recipe
🎉 Final Thoughts
And there you have it! A complete guide to creating the most incredible cheesy thumbprint appetizers. From their flaky, tender crust to their rich, bubbly cheese filling, these little bites are guaranteed to bring joy to any table and silence to any room (because everyone will be too busy munching!). They are truly the quintessential easy party snacks, perfect for any occasion where deliciousness is required.
So, roll up your sleeves, embrace the joy of baking, and get ready to impress everyone with these delightful homemade appetizers. Happy baking, and happy snacking!
Cheesy Thumbprint Appetizers
Crispy, buttery pastry bites filled with a savory blend of sharp cheddar and cream cheese, topped with sweet-hot pepper jelly. An addictive 3-ingredient treat perfect for any gathering.
Ingredients
Instructions
Pulse the cheddar, flour, and cold butter in a food processor until it forms a coarse, clumping dough. If doing by hand, cut butter into the dry ingredients and knead until it comes together.
Preheat oven to 375°F (190°C). Roll dough into 1-inch balls. Place on parchment-lined sheets and create a deep indentation with your thumb.
Add a scant ½ teaspoon of pepper jelly into the well of each ball.
Kitchen Notes
Pre-shredded cheese is coated in starch to prevent clumping. That starch prevents the dough from binding properly. Always shred your cheddar from a block!
Don’t skip the chill! It firms the butter and creates that signature crisp shortbread texture rather than a greasy, flat cookie.
The jelly will melt and expand. Use less than you think you need to keep the baking sheet mess-free.
For the perfect thumbprint well, use the back of a small 1/2 teaspoon measuring spoon to get a deep, uniform hole every time.
Variations
Add crispy bacon bits and finely chopped fresh chives into the dough when you mix it.
Use shredded Pepper Jack cheese instead of cheddar for a subtle spicy kick.
Skip the jelly and fill with a teaspoon of basil pesto and a tiny cube of mozzarella cheese.
Drizzle the finished bites with a tiny bit of honey and a sprinkle of flaky sea salt.
Keep leftovers in an airtight container for up to 3 days. Re-crisp in a 350°F oven for 3 minutes.
Form dough balls, indent them, and freeze on a tray. Bag them up and bake from frozen whenever you have guests!





I don’t understand why all the photos show a cheesey looking dough with jam filling the crevice but the recipe has a “plain” dough with a cheese filling.
Hi Terry! Thank you so much for catching that and bringing it to my attention. You’re totally right—there was a mix-up in the recipe steps! I’ve just updated the recipe card to properly reflect the cheese dough and jam/jelly filling shown in the photos. Thanks for helping me fix it
The recipe calls for cream cheese. Where does it come in?