

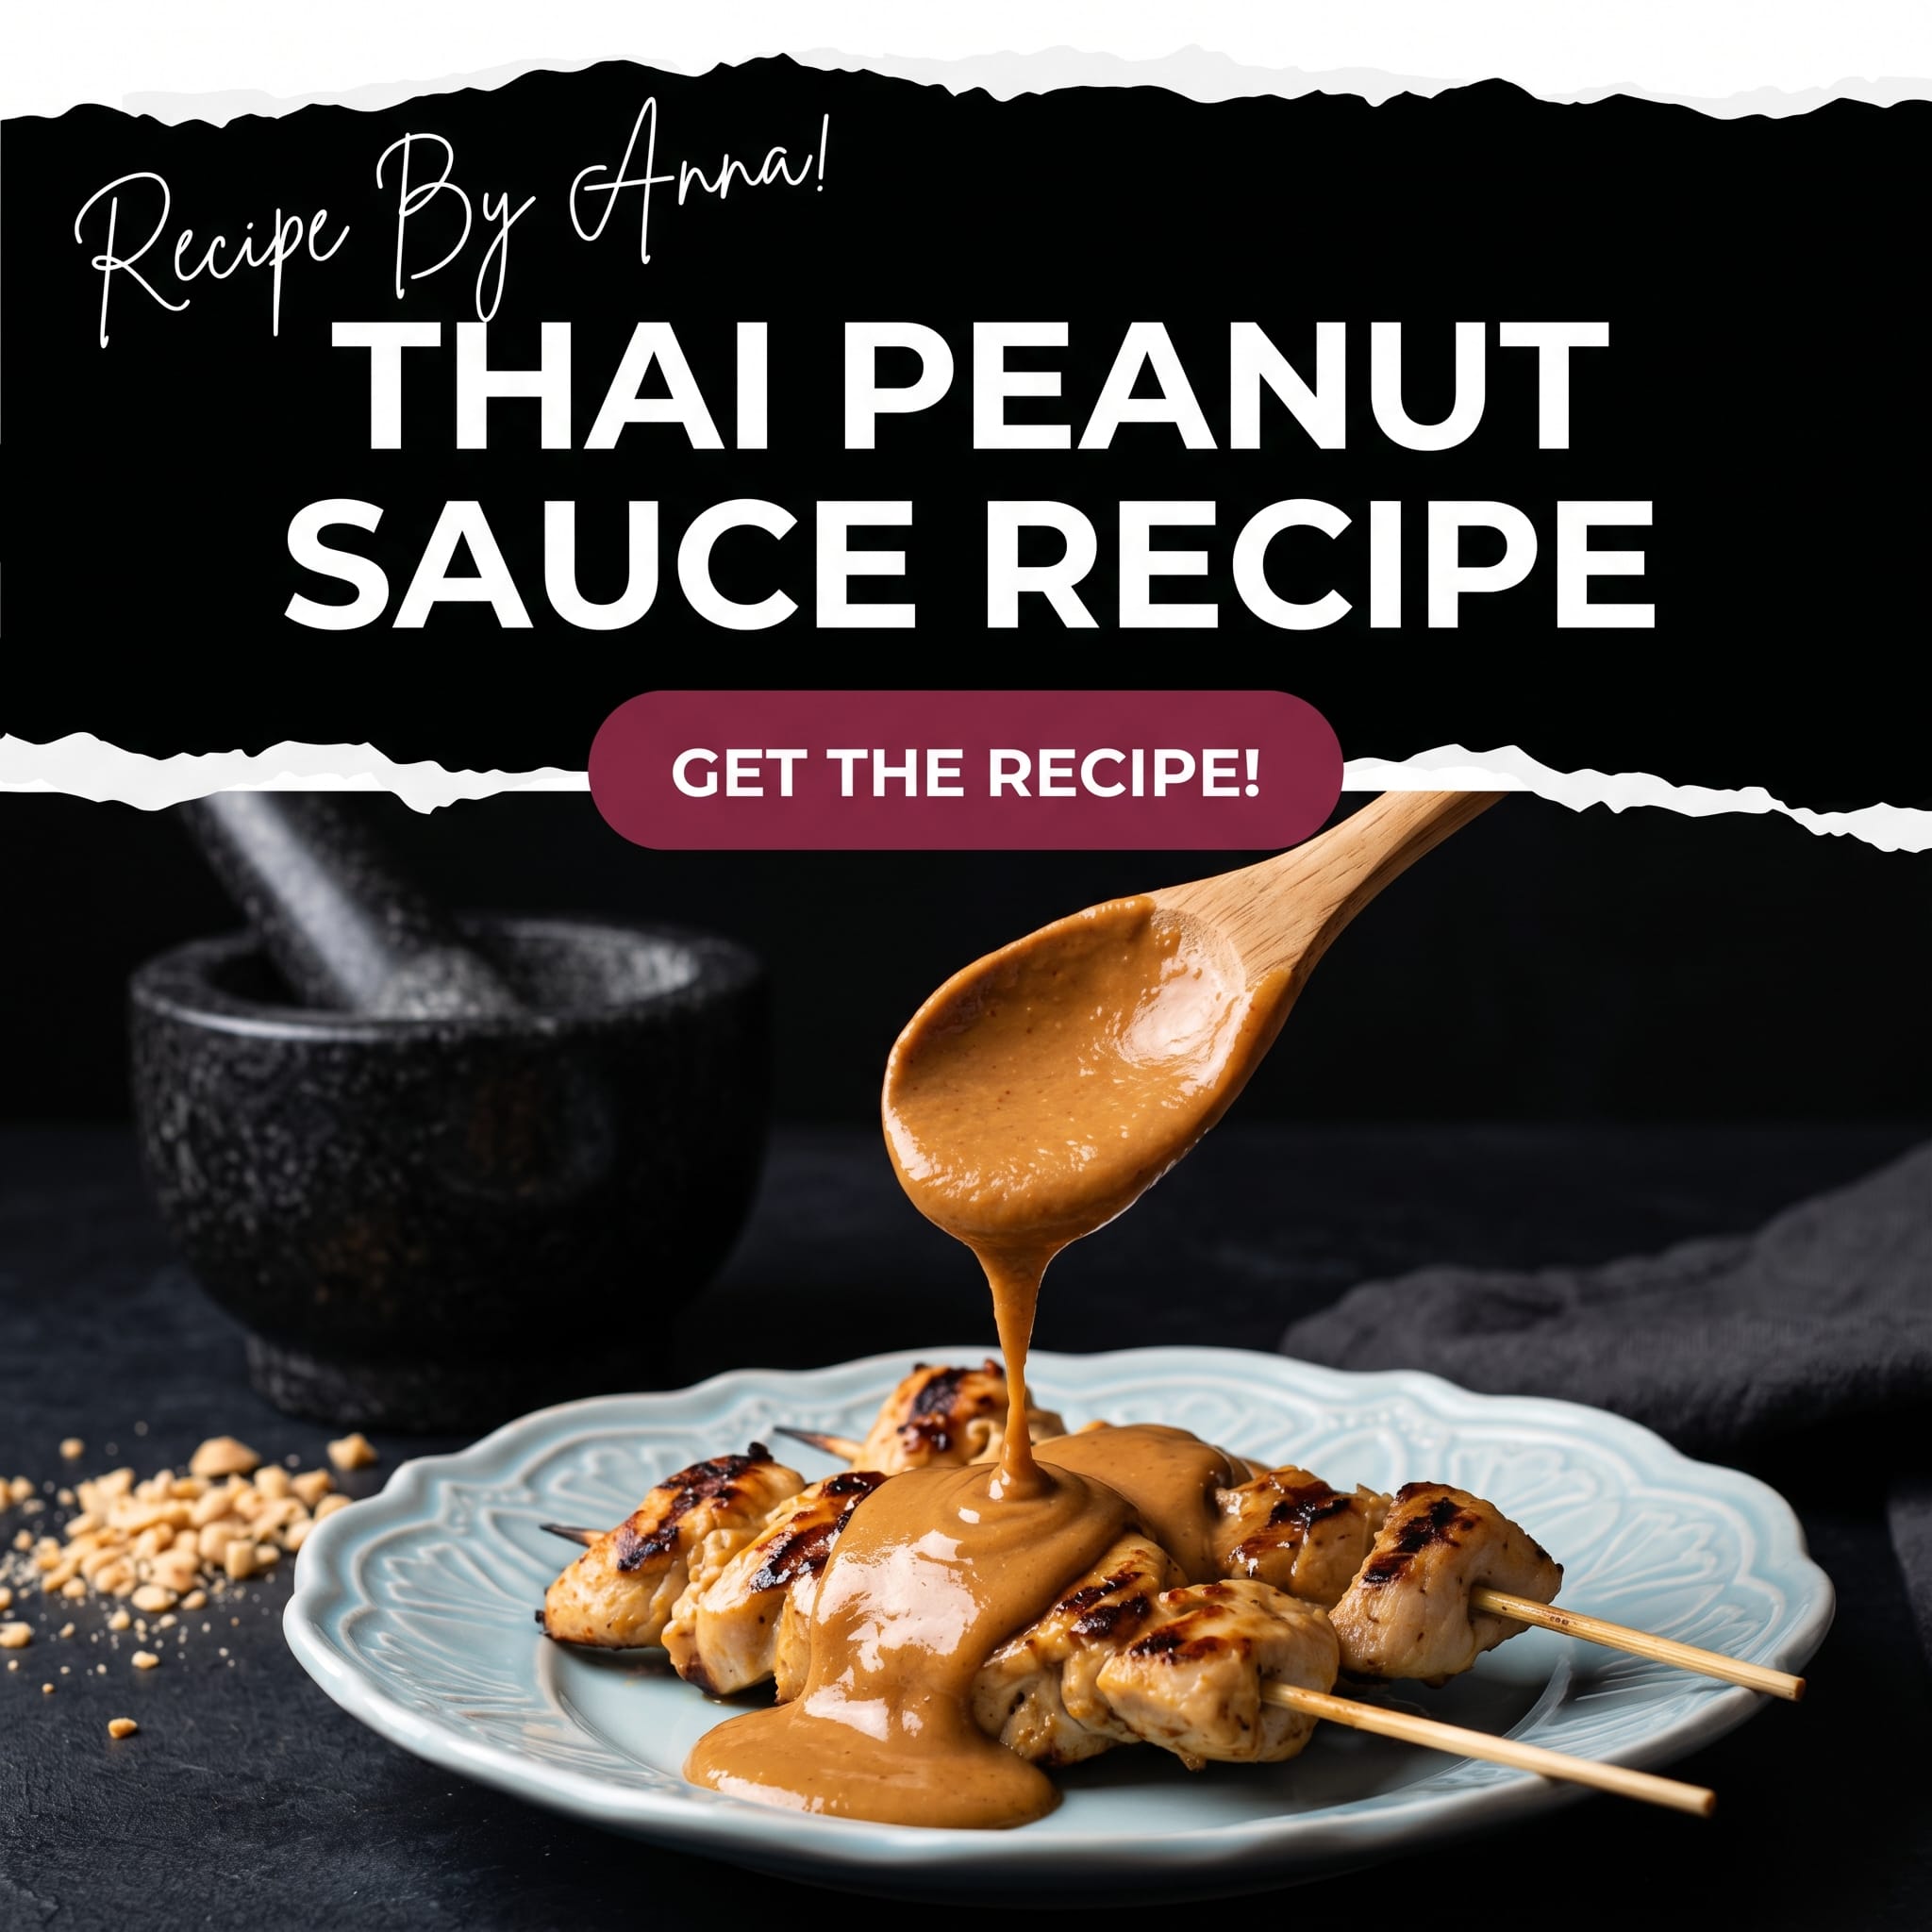
Thai Peanut Sauce: Creamy, Bold & Easy Homemade Recipe
Oh, hello there, fellow food adventurer! Are you tired of mediocre, gloopy, or just plain *boring* sauces that promise a taste of Thailand but deliver… well, something less than spectacular? Have you ever stared at a jar of “Thai Peanut Sauce” on the supermarket shelf, wondering if it truly held the magic you craved? Or perhaps you’ve been on a quest for that perfect balance of sweet, savory, tangy, and a touch of spicy, only to be met with disappointment?
Fear not, my friend, because your culinary journey for the ultimate dipping, drizzling, and dressing delight ends here! Today, we’re diving headfirst into the creamy, dreamy, and utterly delicious world of homemade Thai Peanut Sauce. Forget those sad, pale imitations. We’re talking about a bold, vibrant, and incredibly easy recipe that will have your taste buds doing a happy dance – possibly even the Macarena, if they’re feeling particularly spirited.
This isn’t just any peanut sauce. This is homemade Thai Peanut Sauce that’s so good, you’ll want to put it on everything. And trust me, you absolutely can! It’s so versatile, it might just become your kitchen’s unsung hero. So, grab your apron, unleash your inner chef, and let’s whip up a batch of liquid gold that will transform your meals from “meh” to “MORE, PLEASE!”
Jump to Recipe😋 Why You’ll Obsess Over This Recipe
Prepare to have your mind blown and your taste buds sing! There are so many reasons why this creamy peanut sauce recipe will become a staple in your kitchen, you might need a bigger fridge just to hold all the batches you’ll be making. Seriously, it’s that good.
- Flavor Explosion: We’re talking layers of taste – the rich nuttiness of peanuts, a bright zing from lime, savory umami from soy sauce, a hint of sweetness, and a gentle warmth from ginger and chili. It’s a symphony for your mouth!
- Ridiculously Easy: If you can press a button on a blender or stir with a spoon, you can make this sauce. No fancy techniques, no hours over a hot stove. Just pure, unadulterated simplicity.
- Lightning Fast: From zero to hero in less than 5 minutes. Perfect for those weeknights when you need a flavor boost without the fuss.
- Healthier Than Store-Bought: You control the ingredients! No mystery additives, excessive sugars, or unhealthy oils. Just pure, wholesome goodness.
- Incredibly Versatile: This isn’t just a dipping sauce; it’s a culinary chameleon! Use it as a salad dressing, a marinade, a noodle sauce, a stir-fry enhancer, or even just spoon it straight from the jar (no judgment here!).
- Impress Your Friends (and Yourself!): Whip this out at your next gathering, and watch the compliments roll in. You’ll feel like a gourmet chef, even if your previous culinary achievement was not burning toast.
So, get ready to say goodbye to bland and hello to bold, because this sauce is about to change your mealtime game forever.
🛒 Ingredients You’ll Need
The beauty of this easy peanut dipping sauce lies in its simple, readily available ingredients. You probably have most of these lurking in your pantry right now! And if not, they’re easy to find at any grocery store.
- Creamy Peanut Butter: The star of our show! Opt for natural, unsweetened peanut butter. The “stir” kind is perfect, as it has minimal added sugar and oils, allowing you to control the sweetness and flavor. Avoid the overly processed, sugary kinds if you can, unless you like your sauce to taste like a candy bar.
- Soy Sauce: For that essential umami and savory depth. Low-sodium is always a good choice so you can adjust the saltiness to your liking.
- Fresh Lime Juice: The secret weapon for brightness and tang. Freshly squeezed is non-negotiable here – bottled lime juice just doesn’t compare.
- Maple Syrup (or Honey/Brown Sugar): To balance out the savory and tangy notes with a touch of sweetness. Adjust to your preference!
- Rice Vinegar: Adds another layer of acidity and a subtle, distinctive tang.
- Toasted Sesame Oil: A little goes a long way to add a nutty, aromatic depth. Don’t skip it!
- Fresh Ginger: Grated or minced, this provides a warm, zesty kick. It’s like a tiny flavor superpower.
- Garlic: Minced, for that pungent, aromatic foundation.
- Chili Garlic Sauce (or Sriracha): For a gentle warmth and a hint of spice. If you like it hot, go bold! If you’re a spice newbie, start small.
- Water (or Coconut Milk): To thin the sauce to your desired consistency. Water keeps it lighter, while a splash of full-fat coconut milk makes it extra creamy and rich.
See? Nothing too exotic! Just a collection of everyday heroes coming together to create something extraordinary.
📝 Step-by-Step Instructions
Ready to make magic? This is where the “easy” part of our homemade Thai Peanut Sauce truly shines. It’s so simple, you’ll wonder why you ever bought it from a jar!
- Gather Your Ingredients: Measure out all your ingredients and have them ready. This is called “mise en place” in fancy chef terms, and it just means less stress for you.
- Combine the Solids (and Peanut Butter): In a medium-sized bowl or a blender, add the peanut butter, soy sauce, lime juice, maple syrup, rice vinegar, sesame oil, grated ginger, minced garlic, and chili garlic sauce.
- Blend or Whisk:
- For a Super Smooth Sauce (Blender Method): If you prefer a completely smooth sauce and have a blender (a small food processor works great too!), simply dump all the ingredients (except the thinning liquid) in and blend until smooth.
- For a Hand-Whisked Sauce (Bowl Method): If you don’t have a blender, or prefer a more rustic texture, just whisk everything vigorously in the bowl. The ginger and garlic might be a tiny bit chunkier, but the flavor will be just as amazing.
- Thin to Perfection: Now, this is where you customize! Start by adding 1-2 tablespoons of water (or coconut milk) at a time, blending or whisking after each addition, until the sauce reaches your desired consistency. Do you want a thick dip for veggies, a slightly thinner sauce for noodles, or a pourable dressing for salad? You decide!
- Taste and Adjust: This is the most crucial step! Dip a spoon (or a finger, we won’t tell) and taste. Does it need more lime for tang? More maple syrup for sweetness? Another dash of chili garlic for heat? A pinch more salt from the soy sauce? Adjust until it sings to your palate.
- Serve and Enjoy: Your glorious homemade Thai Peanut Sauce is ready! Drizzle, dip, or slather to your heart’s content.
See? I told you it was easy! And honestly, the best part is getting to taste-test as you go. It’s like a delicious interactive game.
🌶️ Substitution Suggestions
Life happens, and sometimes you don’t have every single ingredient. Don’t let that stop you from making this incredible sauce! Here are some common substitutions that can save the day:
- Peanut Butter:
- Other Nut Butters: Almond butter or cashew butter can be used, though they will subtly change the flavor profile. The sauce will still be delicious, just… almondy or cashewy instead of peanutty.
- Nut-Free (but not “peanut” sauce): For a truly nut-free version, tahini (sesame paste) can work, but this will give you a very different, more Middle Eastern-inspired flavor. If you have a severe peanut allergy, always exercise caution and ensure all ingredients are cross-contamination free.
- Soy Sauce:
- Tamari: A fantastic gluten-free alternative that tastes very similar.
- Coconut Aminos: Another gluten-free and soy-free option, though it’s slightly sweeter and less salty, so you might need to adjust other seasonings.
- Lime Juice:
- Lemon Juice: Can be used in a pinch, though it has a slightly different acidity profile.
- Rice Vinegar: If you’re out of citrus, a little extra rice vinegar can provide tang, but you might miss the fresh lime zest.
- Maple Syrup:
- Honey: A great 1:1 substitute.
- Brown Sugar: Dissolve it in a tiny bit of warm water first if whisking by hand, or it might be gritty.
- Agave Nectar: Another good vegan sweetener option.
- Rice Vinegar:
- Apple Cider Vinegar: Use slightly less, as it can be stronger.
- White Wine Vinegar: Similar to apple cider vinegar, use sparingly.
- Chili Garlic Sauce:
- Sriracha: A classic substitute, usually a bit smoother in texture.
- Red Pepper Flakes: Start with 1/4 teaspoon and let it sit for a few minutes for the heat to bloom, then adjust.
- Fresh Chilies: Minced serrano or Thai bird’s eye chili for a fresh, fiery kick.
Don’t be afraid to experiment! That’s how some of the best culinary discoveries are made.
🔗 More Recipes: Coconut Thai Chicken Curry or Crock Pot Thai Ginger Chicken Soup
🍽️ What to Pair
This homemade Thai Peanut Sauce is so much more than just a dip. It’s a flavor transformer! Here are just a few ideas to get your culinary creativity flowing:
- Dipping Dream:
- Fresh spring rolls or summer rolls (an absolute classic!).
- Crispy chicken, tofu, or veggie satay skewers.
- Raw veggies like cucumber sticks, carrot spears, bell pepper strips, or celery.
- Baked sweet potato fries or regular French fries (don’t knock it ’til you’ve tried it!).
- Noodle Nirvana:
- Toss with warm or cold noodles for an instant weeknight meal. Add some shredded chicken, tofu, or crunchy veggies for a complete dish.
- Use as a base for a quick Pad Thai-inspired stir-fry.
- Salad Sensation:
- Thin it out a bit more with water or coconut milk, and it makes an incredible dressing for green salads, quinoa salads, or even a cabbage slaw.
- Marinade Magic:
- Marinate chicken, pork, beef, tofu, or tempeh before grilling, baking, or pan-frying for an incredible flavor boost.
- Stir-Fry Star:
- Add a generous dollop to your stir-fries towards the end of cooking for a rich, flavorful sauce.
- Sandwich & Wrap Enhancer:
- Spread it inside wraps or sandwiches for a punch of flavor that goes beyond mayo.
Seriously, once you have a batch of this sauce on hand, your meal possibilities multiply exponentially. It’s like having a secret flavor weapon in your fridge!

📊 Nutritional Information
While I can’t provide exact nutritional values without knowing specific brands and quantities of your ingredients (and I’m a blog post, not a nutritionist!), I can tell you that making your own Thai Peanut Sauce generally offers several benefits over many store-bought varieties:
- Lower in Sugar: You control the sweetness, often resulting in significantly less added sugar than commercial brands.
- Healthier Fats: Using natural peanut butter means you’re getting healthy monounsaturated and polyunsaturated fats, without the hydrogenated oils often found in processed sauces.
- No Mystery Additives: Say goodbye to preservatives, artificial colors, and flavors. You know exactly what’s going into your body.
- Fresh Ingredients: Fresh ginger and garlic provide not just flavor, but also beneficial compounds.
Of course, peanut butter is calorie-dense, so while it’s packed with good fats and protein, portion control is always wise if you’re watching your intake. But hey, a little indulgence in something delicious and homemade is good for the soul!
⭐ Pro Tips for the Perfect Batch
While this recipe is incredibly forgiving, a few insider tricks can elevate your homemade Thai Peanut Sauce from great to absolutely legendary!
- Quality Peanut Butter is Key: This is the foundation of your sauce, so choose wisely. Natural, creamy peanut butter with minimal ingredients (just peanuts and maybe salt) will give you the best flavor and texture. Avoid brands with lots of added sugar or oils if possible.
- Freshness Matters: Use freshly squeezed lime juice and fresh ginger and garlic. The vibrant flavors they provide are incomparable to bottled alternatives or dried spices. It makes a huge difference!
- Taste, Taste, Taste!: I can’t stress this enough. Our palates are all different, and ingredients vary. Always taste your sauce before serving and adjust the sweetness, saltiness, tang, and spice to your personal preference. This is where your inner chef truly shines!
- Adjust Consistency Gradually: When thinning the sauce, add your water or coconut milk a tablespoon at a time. It’s much easier to add more liquid than to try and thicken a too-runny sauce (unless you have more peanut butter on hand!).
- Let it Mingle: While delicious immediately, the flavors in this sauce deepen and meld beautifully if you let it sit for at least 30 minutes, or even better, overnight in the fridge. It’s like a good friendship – better with time!
- Grate, Don’t Chop: For ginger and garlic, grating or using a microplane will integrate them more smoothly into the sauce, preventing any chunky bits that might surprise your taste buds.
🌟 Easy Variations to Try
Once you’ve mastered the basic creamy peanut sauce recipe, feel free to get creative and customize it to your heart’s content! Here are some ideas to spark your imagination:
- Extra Spicy: Add more chili garlic sauce, a pinch of cayenne pepper, or finely minced fresh bird’s eye chilies. Prepare for a delicious fiery kick!
- Herbaceous Heaven: Stir in a handful of finely chopped fresh cilantro or basil at the very end. This adds a beautiful freshness and aromatic complexity.
- Coconut Dream: Replace all or part of the water with full-fat coconut milk for an even richer, creamier, and more subtly sweet sauce with an undeniable tropical vibe.
- Sesame Star: For an extra nutty boost, add a tablespoon of toasted sesame seeds to the sauce or sprinkle them on top as a garnish.
- Citrus Boost: Add a tiny bit of lime zest along with the juice for an even brighter, more aromatic citrus punch.
- Soy-Free: If you’re avoiding soy, simply use tamari or coconut aminos in place of soy sauce. The flavor will be slightly different but still fantastic.
The possibilities are endless! Don’t be afraid to experiment and find your signature twist.
❄️ How to Store & Reheat
One of the best things about this easy peanut dipping sauce is that it’s fantastic for meal prep! Make a big batch, and you’ll have deliciousness on demand.
- Storage: Transfer your homemade Thai Peanut Sauce to an airtight container (a mason jar works perfectly!) and store it in the refrigerator. It will keep beautifully for up to 5-7 days.
- Thickening in the Fridge: Don’t be alarmed if your sauce thickens considerably in the fridge. This is completely normal due to the peanut butter firming up when cold.
- Reheating & Thinning: When you’re ready to use it, simply take it out of the fridge and let it come to room temperature for about 15-20 minutes. If it’s still too thick for your liking (which it likely will be), stir in a tablespoon or two of warm water (or coconut milk) until it reaches your desired consistency again. A quick whisk usually does the trick!
- Freezing: While technically possible, freezing can sometimes alter the texture of the sauce, making it a bit grainy when thawed. It’s generally best enjoyed fresh or from the fridge within a week.
🚧 Common Mistakes to Avoid
Even though this recipe is super simple, there are a few pitfalls you can easily sidestep to ensure your homemade Thai Peanut Sauce turns out perfect every time:
- Using Sugary Peanut Butter: As mentioned, highly processed, sugary peanut butter can make your sauce overly sweet and mask the other delicious flavors. Stick to natural, unsweetened for best results.
- Skipping the Fresh Ingredients: Dried ginger or garlic powder just won’t give you the same vibrant, zesty punch as fresh. Invest a few minutes in grating and mincing – it’s worth it!
- Not Tasting and Adjusting: This is the biggest mistake! Every batch of ingredients can vary slightly, and everyone has different preferences. Always taste your sauce and tweak the sweet, sour, salty, and spicy balance until it’s perfect for YOU.
- Adding Too Much Liquid at Once: You want a gradual thinning process. A little liquid goes a long way, and it’s much easier to add more than to try and salvage a watery sauce.
- Over-processing in a Blender: If you’re using a blender, blend just until smooth. Over-blending can sometimes make the sauce warm and slightly affect the texture.
- Serving Straight from the Fridge (Too Cold): While the sauce is safe to eat cold, bringing it to room temperature or slightly warming it will allow the flavors to truly open up and shine.
❓ FAQ
Here are some frequently asked questions about this glorious homemade Thai Peanut Sauce:
Q: Can I make this sauce nut-free?
A: Unfortunately, a true “peanut” sauce cannot be nut-free. However, if you’re avoiding peanuts but not other nuts, you could try almond or cashew butter for a similar consistency, though the flavor profile will change. For a completely nut-free sauce, tahini can be used, but this will result in a completely different, Middle Eastern-inspired sauce rather than a Thai peanut sauce.
Q: Is this recipe vegan and gluten-free?
A: Yes! As written, this recipe is naturally vegan (assuming you use maple syrup and not honey). To make it gluten-free, simply ensure you use tamari instead of regular soy sauce, as traditional soy sauce contains wheat. Always check labels for all your ingredients.
Q: How long does homemade peanut sauce last?
A: Stored in an airtight container in the refrigerator, this sauce will last for up to 5-7 days. The flavors actually meld and deepen over time, making it even better on day two or three!
Q: Can I use crunchy peanut butter?
A: You can, but it will result in a sauce with a different texture, obviously. If you prefer a smooth sauce, stick with creamy. If you don’t mind little bits of peanut, go for it! Just be aware it might not blend as smoothly.
Q: My sauce is too thick/too thin. What do I do?
A: If it’s too thick, simply whisk in a tablespoon of warm water or coconut milk at a time until you reach your desired consistency. If it’s too thin, you can try adding a bit more peanut butter, or let it sit in the fridge for a while, as it naturally thickens when cold.
🎉 Final Thoughts
And there you have it! Your very own, incredibly delicious, creamy, bold, and easy homemade Thai Peanut Sauce. You’ve unlocked the secret to transforming everyday meals into something truly special, all with just a few simple ingredients and a handful of minutes.
No more settling for bland store-bought versions. No more dreaming of that perfect satay sauce. You’ve got the power to create it yourself, right in your own kitchen! This sauce is a testament to the fact that sometimes, the simplest things bring the most joy (and flavor!).
So, go forth and drizzle, dip, and delight! Experiment with pairings, tweak the flavors to your heart’s content, and enjoy the endless possibilities this magical sauce brings to your table. Your taste buds (and your family and friends) will thank you. Happy cooking, my friend!
Thai Peanut Sauce: Creamy, Bold & Easy Homemade Recipe
Course: SauceCuisine: Thai-InspiredDifficulty: Easy8
servings10
minutes40
minutes120
kcalIngredients
1/2 cup creamy natural peanut butter
2 tablespoons soy sauce (low-sodium preferred)
2 tablespoons fresh lime juice
1 tablespoon maple syrup, honey, or brown sugar
1 tablespoon rice vinegar
1 teaspoon toasted sesame oil
1 teaspoon fresh ginger, grated
2 cloves garlic, minced
1 teaspoon chili garlic sauce or sriracha (adjust to taste)
2–6 tablespoons water or coconut milk, as needed
Directions
- Measure all ingredients and have them ready before starting.
- In a medium bowl or blender, combine the peanut butter, soy sauce, lime juice, maple syrup, rice vinegar, sesame oil, grated ginger, minced garlic, and chili garlic sauce.
- Whisk thoroughly until combined, or blend until completely smooth.
- Add water or coconut milk 1 tablespoon at a time, stirring after each addition until the sauce reaches your preferred consistency.
- For a thick dipping sauce, use less liquid. For a pourable dressing or noodle sauce, add more liquid.
- Taste the sauce and adjust as needed with extra lime juice, sweetener, soy sauce, or chili sauce.
- Transfer to a serving bowl or storage container.
- Serve immediately or refrigerate until ready to use.
- Notes
- Natural peanut butter works best: It provides the freshest flavor and smoothest texture.
- Customize the consistency: Water keeps the sauce lighter, while coconut milk creates a richer, creamier result.
- Adjust the heat: Add extra sriracha or chili garlic sauce for a spicier sauce.
- Storage tip: Store in an airtight container in the refrigerator for up to 1 week.
- Serving ideas: Perfect with spring rolls, grilled chicken, noodle bowls, vegetable stir-fries, satay skewers, or as a salad dressing.
- Make it vegan: Use maple syrup instead of honey.
Notes
- Natural peanut butter gives the best flavor and texture.
For a richer sauce, use coconut milk instead of water.
The sauce thickens slightly as it sits; thin with a splash of water if needed.
Store in an airtight container in the refrigerator for up to 1 week.
If serving cold, let it sit at room temperature for a few minutes and stir before using.


This recipe, unfortunately, includes no quantities for any of the ingredients. 🙁
I have just updated the post and added a full recipe card with all the precise quantities and ingredients listed out for you.
Please let me know how the sauce turns out, and thank you for helping me make the blog better!